本文所有的代码均基于 node.js 14 LTS 版本分析
概念 进程是对正在运行中的程序的一个抽象,是系统进行资源分配和调度的基本单位,操作系统的其他所有内容都是围绕着进程展开的
线程是操作系统能够进行运算调度的最小单位,其是进程中的一个执行任务(控制单元),负责当前进程中程序的执行
一个进程至少有一个线程,一个进程可以运行多个线程,这些线程共享同一块内存,线程之间可以共享对象、资源
单线程 1 2 3 4 5 6 7 require ("http" ) .createServer ((req, res ) => { res.writeHead (200 ); res.end ("Hello World" ); }) .listen (8000 ); console .log ("process id" , process.pid );
top -pid 28840 查看线程数可见在这种情况下有 7 个线程
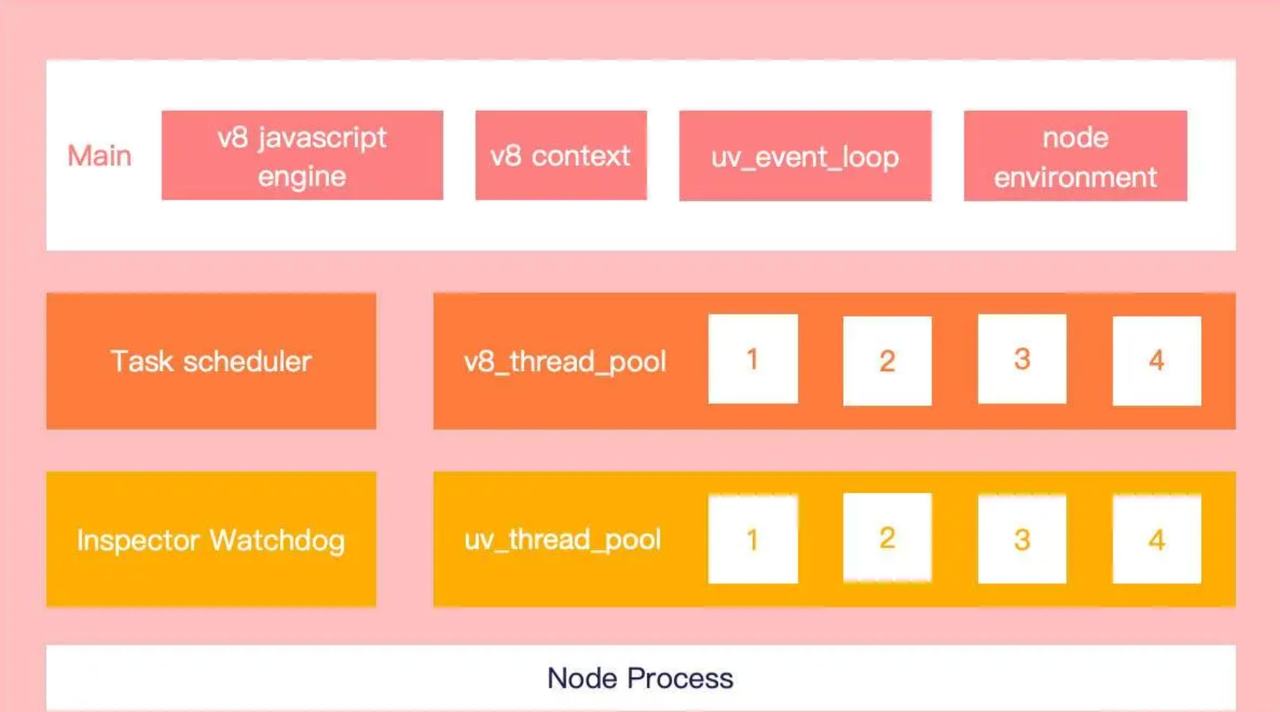
一个 node 进程通常包含:
1 个 Javascript 执行主线程
1 个 watchdog 监控线程用于处理调试信息
1 个 v8 task scheduler 线程用于调度任务优先级
4 个 v8 线程用于执行代码调优与 GC 等后台任务
异步 I/O 的 libuv 线程池(如果涉及文件读写,默认为 4 个,可通过process.env.UV_THREADPOOL_SIZE进行设置。网络 I/O 不占用线程池)
事件循环 既然 js 执行线程只有一个,那么 node 还能支持高并发在于 node 进程中通过 libuv 实现了一个事件循环机制,当执主程发生阻塞事件,如 I/O 操作时,主线程会将耗时的操作放入事件队列中,然后继续执行后续程序。
整个流程分为 2 个 while 循环
外层大循环,执行 uv_run + DrainVMTasks
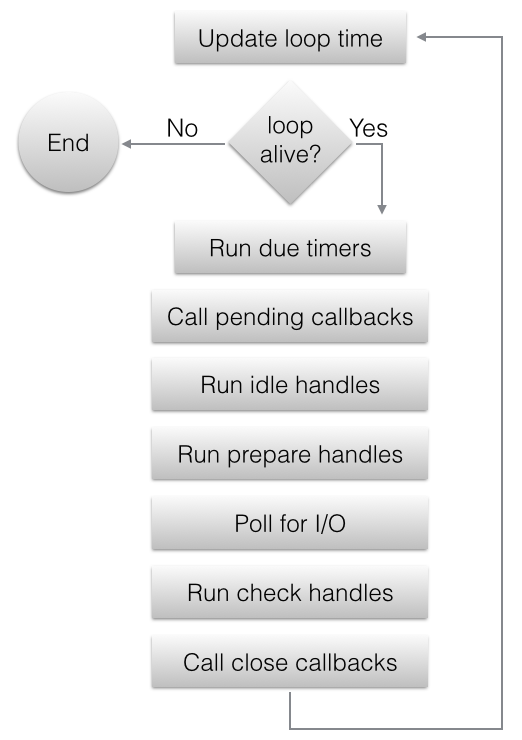
内层 libuv uv_run事件循环
1 2 3 4 5 6 7 8 9 10 11 12 13 14 15 16 17 18 19 20 21 22 23 24 25 26 27 28 29 30 31 32 33 34 35 36 int Run (); namespace node { int nodeMainInstance ::Run () { do { uv_run (env->event_loop (), UV_RUN_DEFAULT ); per_process ::v8_platform.DrainVMTasks (isolate_); more = uv_loop_alive (env->event_loop ()); if (more && !env->is_stopping ()) continue ; if (!uv_loop_alive (env->event_loop ())) { if (EmitProcessBeforeExit (env.get ()).IsNothing ()) break ; } more = uv_loop_alive (env->event_loop ()); } while (more == true && !env->is_stopping ()); } }
主要有 libuv 提供的两个函数uv_run 和 uv_loop_alive
uv_run(env->event_loop(), UV_RUN_DEFAULT) 执行一轮事件循环 。UV_RUN_DEFAULT 是 libuv 执行事件循环的执行模式,事件循环会一直运行直到没有更多的事件要处理或者程序被强制退出
1 2 3 4 5 typedef enum { UV_RUN_DEFAULT = 0 , UV_RUN_ONCE, UV_RUN_NOWAIT } uv_run_mode;
uv_run代码如下,它的返回值是是否有活跃事件
1 2 3 4 5 6 7 8 9 10 11 12 13 14 15 16 17 18 19 20 21 22 23 24 25 26 27 28 29 30 31 32 33 34 35 36 37 38 39 40 41 42 43 44 45 46 47 48 49 50 51 52 53 54 55 56 57 58 59 60 61 62 int uv_run (uv_loop_t * loop, uv_run_mode mode) { int timeout; int r; int ran_pending; r = uv__loop_alive(loop); if (!r) uv__update_time(loop); while (r != 0 && loop->stop_flag == 0 ) { uv__update_time(loop); uv__run_timers(loop); ran_pending = uv__run_pending(loop); uv__run_idle(loop); uv__run_prepare(loop); timeout = 0 ; if ((mode == UV_RUN_ONCE && !ran_pending) || mode == UV_RUN_DEFAULT) timeout = uv_backend_timeout(loop); uv__io_poll(loop, timeout); uv__metrics_update_idle_time(loop); uv__run_check(loop); uv__run_closing_handles(loop); if (mode == UV_RUN_ONCE) { uv__update_time(loop); uv__run_timers(loop); } r = uv__loop_alive(loop); if (mode == UV_RUN_ONCE || mode == UV_RUN_NOWAIT) break ; } if (loop->stop_flag != 0 ) loop->stop_flag = 0 ; return r; }
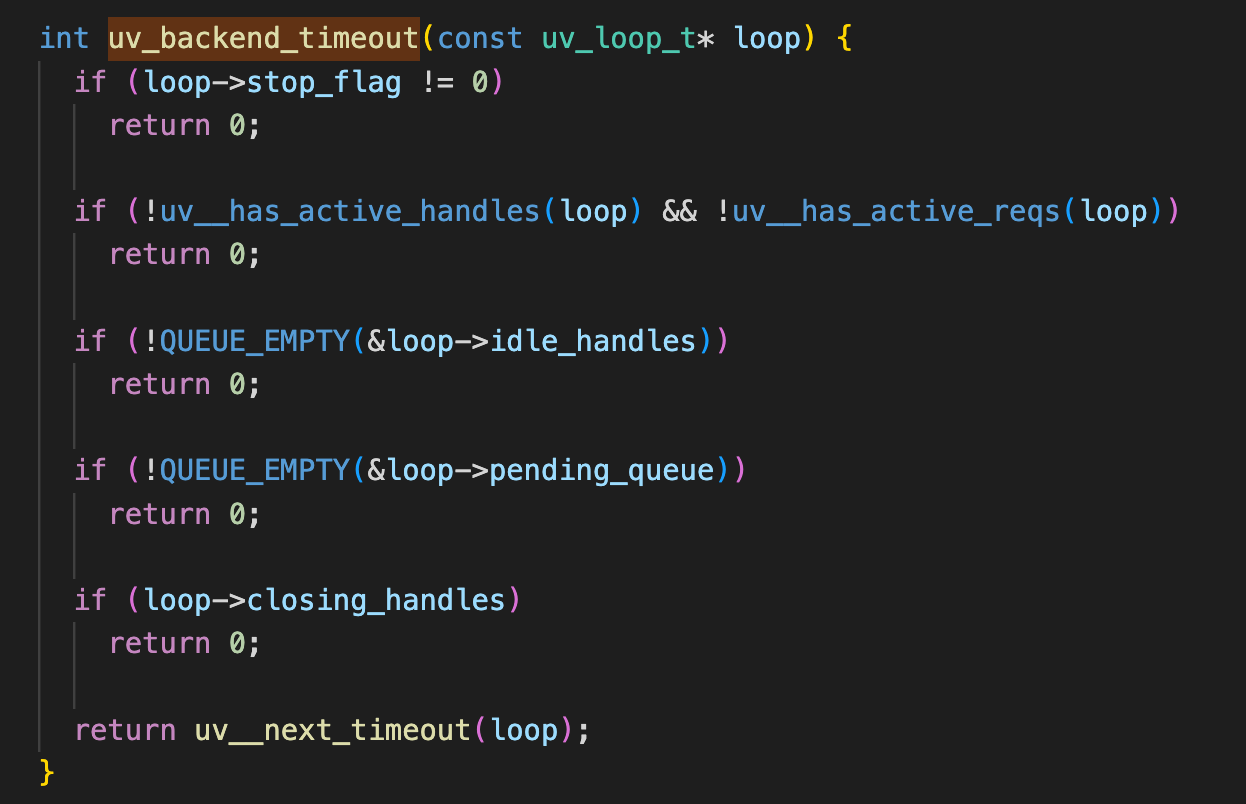
uv_backend_timeout 正常是查询最近的定时器间隔,有几种情况返回 0,即有一些更重要的事要做而不是同步等待 io 事件
其中idle_handles 由setImmediate 设置执行一些高优任务,马上进入下一次循环处理setImmediate回调
一次事件循环总结
uv_loop_alive(env->event_loop())
即上面提到的 uv__loop_alive, 判断有没有活跃的事件(事件监听 I/O、定时器等)
总结 严格意义上来说对开发者写代码来说是单线程的,但是对于底层来说是多线程(例如源码中会有 SafeMap 这种线程安全的 map)。由于对于开发者来说是单线程,所以在 Node.js 日程开发中通常不会存在线程竞争的问题和线程锁的一些概念
子进程 从上面的单线程机制可知 Node.js 使用事件循环机制来实现高并发的 I/O 操作。但是如果代码中遇到 CPU 密集型场景,主线程将会长时间阻塞,无法处理额外的请求。为了解决这个问题,并充分发挥多核 CPU 的性能,Node 提供了 child_process 模块用于创建子进程。通过将 CPU 密集型操作分配给子进程处理,主线程可以继续处理其他请求,从而提高性能
spawn(command[, args][, options]):以指定的命令及参数数组创建一个子进程。可以通过流 来处理子进程的输出和错误信息,大数据量
1 2 3 4 5 6 7 8 9 10 11 12 13 14 15 const { spawn } = require ("child_process" );const ls = spawn ("ls" , ["-lh" , "/usr" ]);ls.stdout .on ("data" , (data ) => { console .log (`stdout: ${data} ` ); }); ls.stderr .on ("data" , (data ) => { console .error (`stderr: ${data} ` ); }); ls.on ("close" , (code ) => { console .log (`子进程退出码:${code} ` ); });
exec(command[, options][, callback]):对 spawn() 函数的封装,可以直接传入命令行执行,并以回调函数 的形式返回输出和错误信息
1 2 3 4 5 6 7 8 9 10 const { exec } = require ("child_process" );exec ("ls -lh /usr" , (error, stdout, stderr ) => { if (error) { console .error (`exec error: ${error} ` ); return ; } console .log (`stdout: ${stdout} ` ); console .error (`stderr: ${stderr} ` ); });
execFile(file[, args][, options][, callback]):类似于 exec() 函数,但默认不会创建命令行环境(相应的无法使用一些 shell 的操作符),而是直接以传入的文件创建新的进程,性能略微优于 exec()。
1 2 3 4 5 6 7 8 9 const { execFile } = require ("child_process" );execFile ("ls" , ["-lh" , "/usr" ], (error, stdout, stderr ) => { if (error) { console .error (`execFile error: ${error} ` ); return ; } console .log (`stdout: ${stdout} ` ); console .error (`stderr: ${stderr} ` ); });
fork(modulePath[, args][, options]):内部使用 spawn()实现 ,只能用于创建 node.js 程序的子进程,默认会建立父子进程之间的 IPC 信道来传递消息
1 2 3 4 5 6 7 8 9 10 11 const { fork } = require ("child_process" );const lsProcess = fork ("./test.js" );lsProcess.on ("message" , (msg ) => { console .log (`收到子进程的消息:${msg} ` ); }); lsProcess.on ("close" , (code ) => { console .log (`子进程退出码:${code} ` ); });
js - lib/child_process.js
1 2 3 4 5 6 7 8 9 10 11 12 13 14 15 16 17 18 19 20 21 const child_process = require ("internal/child_process" );const { ChildProcess } = child_process;function spawn (file, args, options ) { const child = new ChildProcess (); return child; } module .exports = { _forkChild, ChildProcess , exec, execFile, execFileSync, execSync, fork, spawn : spawnWithSignal, spawnSync, };
lib/internal/child_process.js
1 2 3 4 5 6 7 8 const { Process } = internalBinding ("process_wrap" );this ._handle = new Process ();ChildProcess .prototype spawn = function (options ) { const err = this ._handle .spawn (options); };
c++ - src/node_binding.cc
Cluster 基于child_process node 提供了专门用于创建多进程网络服务的[cluster](https://nodejs.org/api/cluster.html)模块
1 2 3 4 5 6 7 8 9 10 11 12 13 14 15 16 17 18 19 20 21 22 23 24 25 26 27 28 const cluster = require ("cluster" );const http = require ("http" );const numCPUs = require ("os" ).cpus ().length ;if (cluster.isMaster ) { console .log (`Master ${process.pid} is running` ); for (let i = 0 ; i < numCPUs; i++) { cluster.fork (); } cluster.on ("exit" , (worker, code, signal ) => { console .log (`Worker ${worker.process.pid} died` ); cluster.fork (); }); } else { console .log (`Worker ${process.pid} started` ); http .createServer ((req, res ) => { res.writeHead (200 ); res.end ("Hello, world!" ); }) .listen (8000 ); }
如何解决多个工作进程监听一个端口的问题
从 js 层面分析
入口区分 - 子进程环境变量含NODE_UNIQUE_ID,在创建子进程时传入
1 2 3 const childOrMaster = "NODE_UNIQUE_ID" in process.env ? "child" : "master" ;module .exports = require (`internal/cluster/${childOrMaster} ` );
http.createServer -> lib/_http_server.js#Server - lib/_http_server.js#Server 继承于 TCP 的lib/net.js#Serverlisten方法调用的是lib/net.js#Server
1 2 3 4 5 6 7 8 9 10 11 12 13 14 15 16 17 18 19 20 21 22 23 24 25 26 27 28 29 30 31 32 33 34 Server .prototype listen = function (...args ) { if (typeof options.port === "number" || typeof options.port === "string" ) { validatePort (options.port , "options.port" ); backlog = options.backlog || backlogFromArgs; if (options.host ) { lookupAndListen ( this , options.port | 0 , options.host , backlog, options.exclusive , flags ); } else { listenInCluster ( this , null , options.port | 0 , 4 , backlog, undefined , options.exclusive ); } return this ; } };
lookupAndListen内部其实也是对option.host进行调dns模块查询host后调的listenInCluster
1 2 3 4 5 6 7 8 9 10 11 12 13 14 15 16 17 18 19 20 21 22 23 24 25 26 27 28 29 30 31 32 33 34 35 36 37 function listenInCluster ( server, address, port, addressType, backlog, fd, exclusive, flags exclusive = !!exclusive; if (cluster === undefined ) cluster = require ("cluster" ); if (cluster.isMaster || exclusive) { server._listen2 (address, port, addressType, backlog, fd, flags); return ; } const serverQuery = { address : address, port : port, addressType : addressType, fd : fd, flags, }; cluster._getServer (server, serverQuery, listenOnMasterHandle); function listenOnMasterHandle (err, handle ) { server._handle = handle; server._listen2 (address, port, addressType, backlog, fd, flags); } }
在 listenInCluster 函数中,会判断当前的进程是否是主进程,
如果是则直接进行调用_listen2监听server。_listen2就是 cluster 出现之前的监听函数
Server.prototype._listen2 = setupListenHandle; // legacy alias
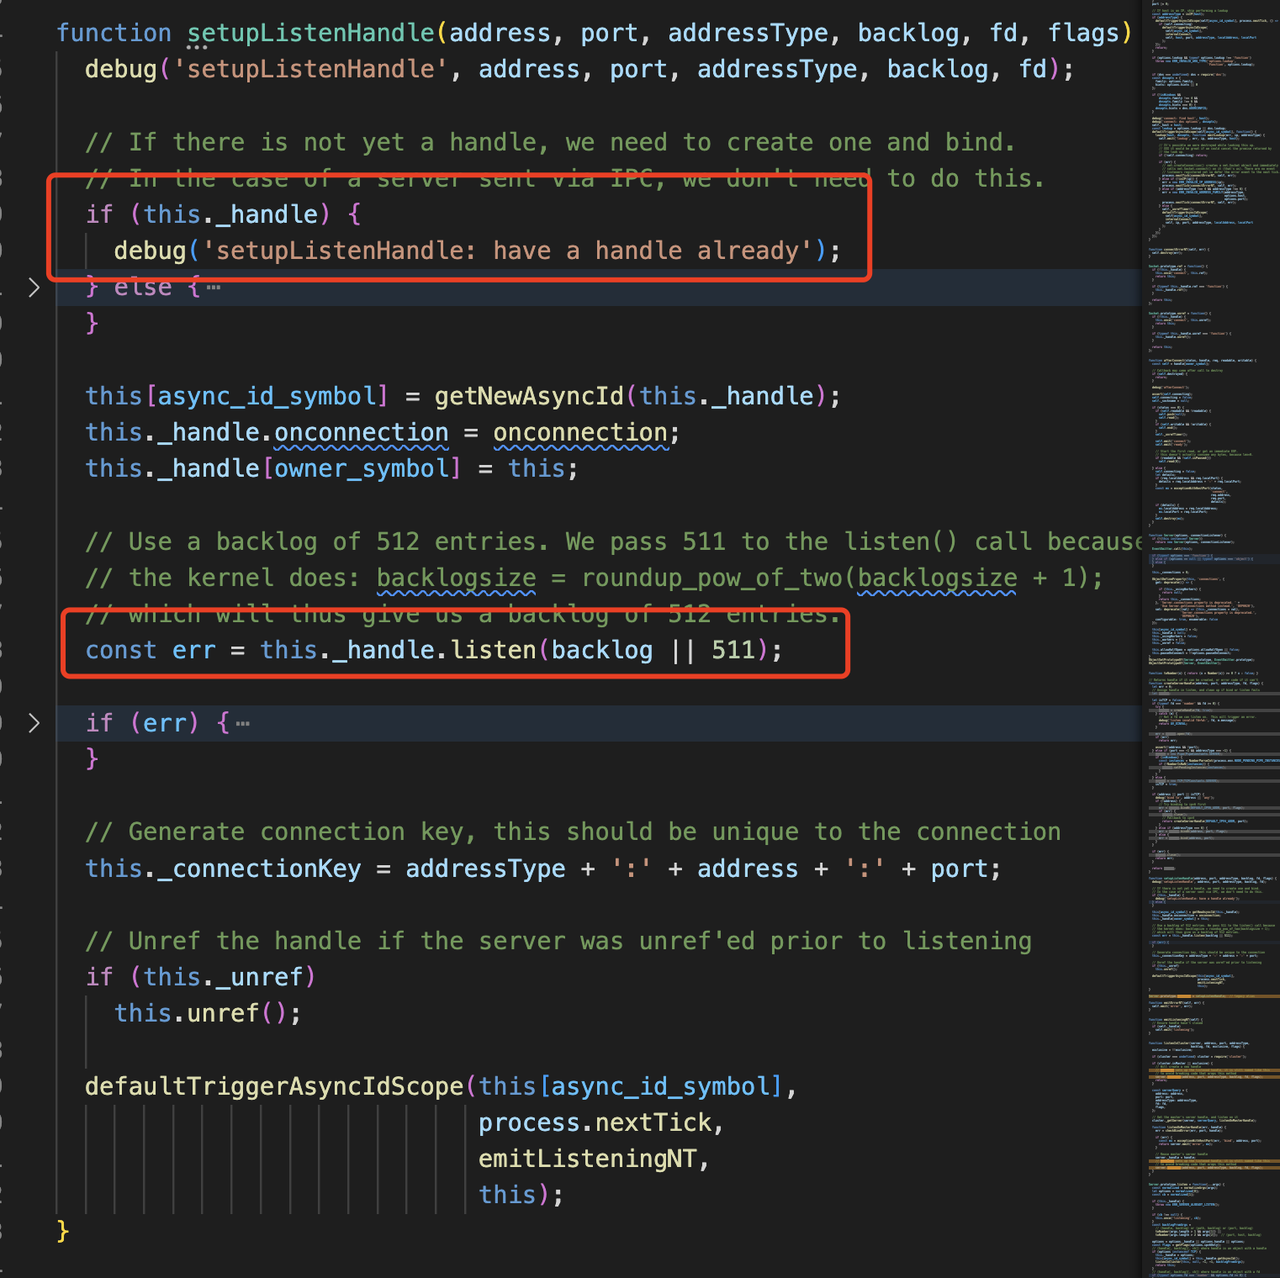
如果不是,则通过工作进程查询到主进程的 handle (const { TCP } = internalBinding('tcp_wrap'); ,c++层暴露的用于处理 TCP 的对象),然后在主进程的 handle 上进行监听
cluster._getServer实现
1 2 3 4 5 6 7 8 9 10 11 12 13 14 15 16 17 18 19 20 21 22 23 24 25 cluster._getServer = function (obj, options, cb ) { const message = { act : 'queryServer' , index, data : null , ...options }; message.address = address; send (message, (reply, handle ) => { else rr (reply, indexesKey, cb); }); obj.once ('listening' , () => { send (message); }); };
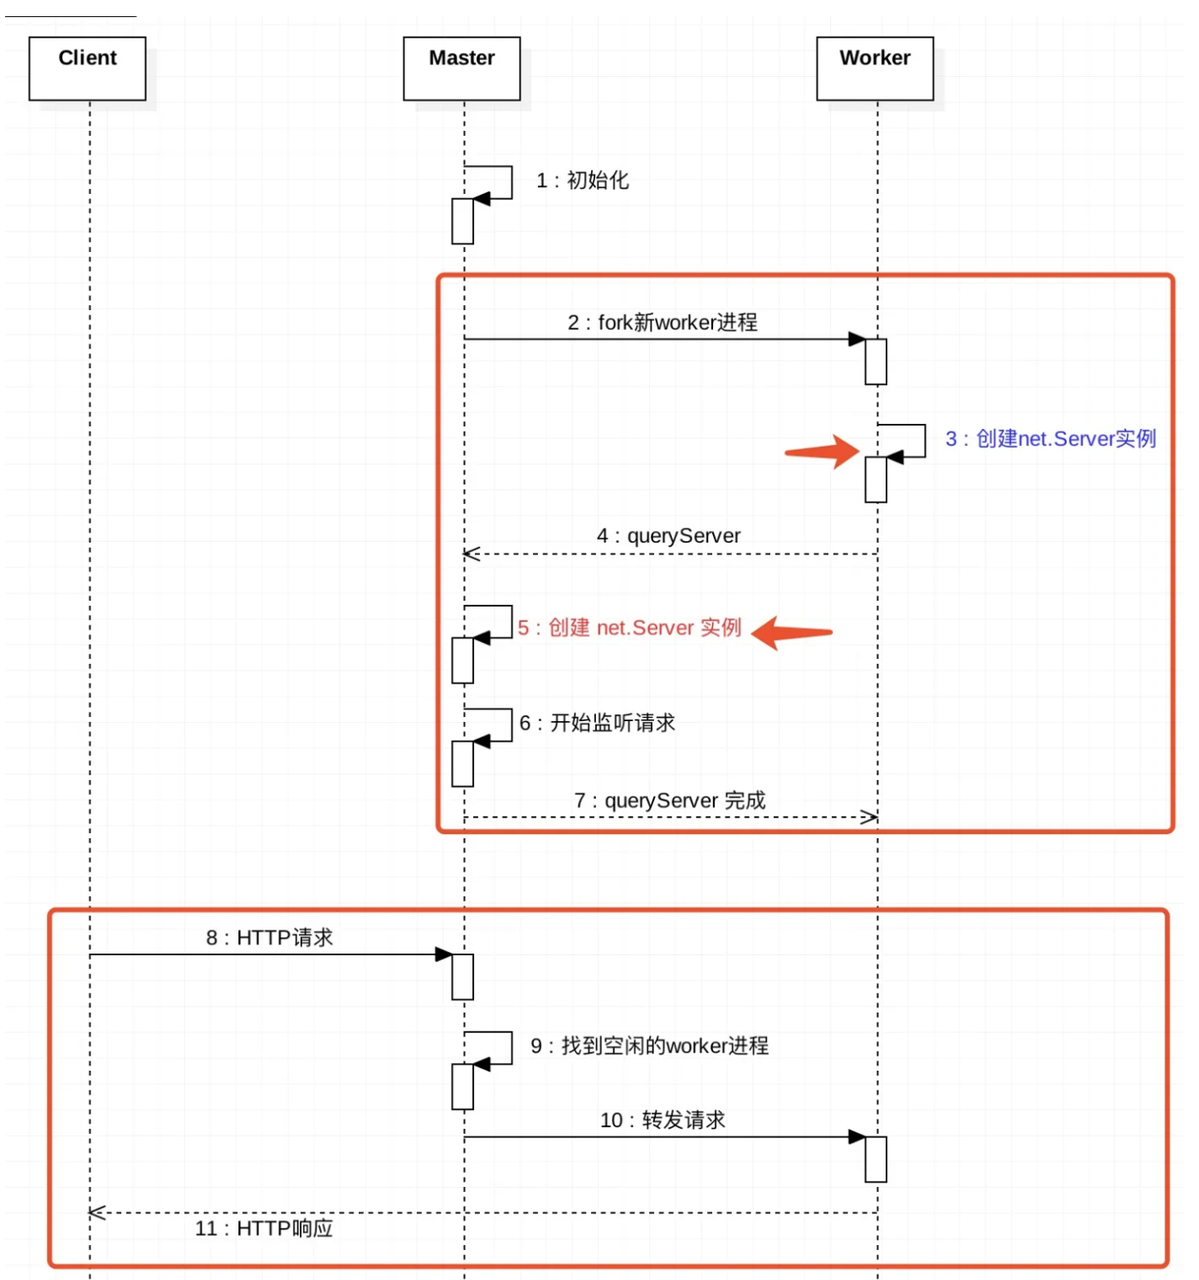
主进程有相应的响应 queryServer 消息的地方
1 2 3 4 5 6 7 8 9 10 11 12 13 14 15 16 17 18 19 20 21 22 23 24 25 26 27 28 29 30 31 32 33 34 35 36 37 38 39 40 41 42 43 44 45 46 47 48 49 50 51 52 function onmessage (message, handle ) { else if (message.act === 'queryServer' ) queryServer (worker, message); } function queryServer (worker, message ) { const key = `${message.address} :${message.port} :${message.addressType} :` + `${message.fd} :${message.index} ` ; let handle = handles.get (key); if (handle === undefined ) { let address = message.address ; let constructor = RoundRobinHandle ; handle = new constructor (key, address, message ); handles.set (key, handle); } if (!handle.data ) handle.data = message.data ; handle.add (worker, (errno, reply, handle ) => { const { data } = handles.get (key); send (worker, { errno, key, ack : message.seq , data, ...reply }, handle); }); } function RoundRobinHandle (key, address, { port, fd, flags } ) { this .server = net.createServer (assert.fail ); this .server .listen (address); this .server .once ('listening' , () => { this .handle = this .server ._handle ; this .handle .onconnection = (err, handle ) => this .distribute (err, handle); }); }
RoundRobinHandle 也会覆盖主进程的Server.handle 的 onconnection 逻辑,将其替换成 round-robin 逻辑,即this.handle.onconnection = (err, handle) => this.distribute(err, handle);
再回到这个代码
1 2 3 4 5 6 7 8 9 10 11 12 13 14 15 16 17 18 cluster._getServer (server, serverQuery, listenOnMasterHandle); send (message, (reply, handle ) => { else rr (reply, indexesKey, cb); }); function listenOnMasterHandle (err, handle ) { server._handle = handle; server._listen2 (address, port, addressType, backlog, fd, flags); }
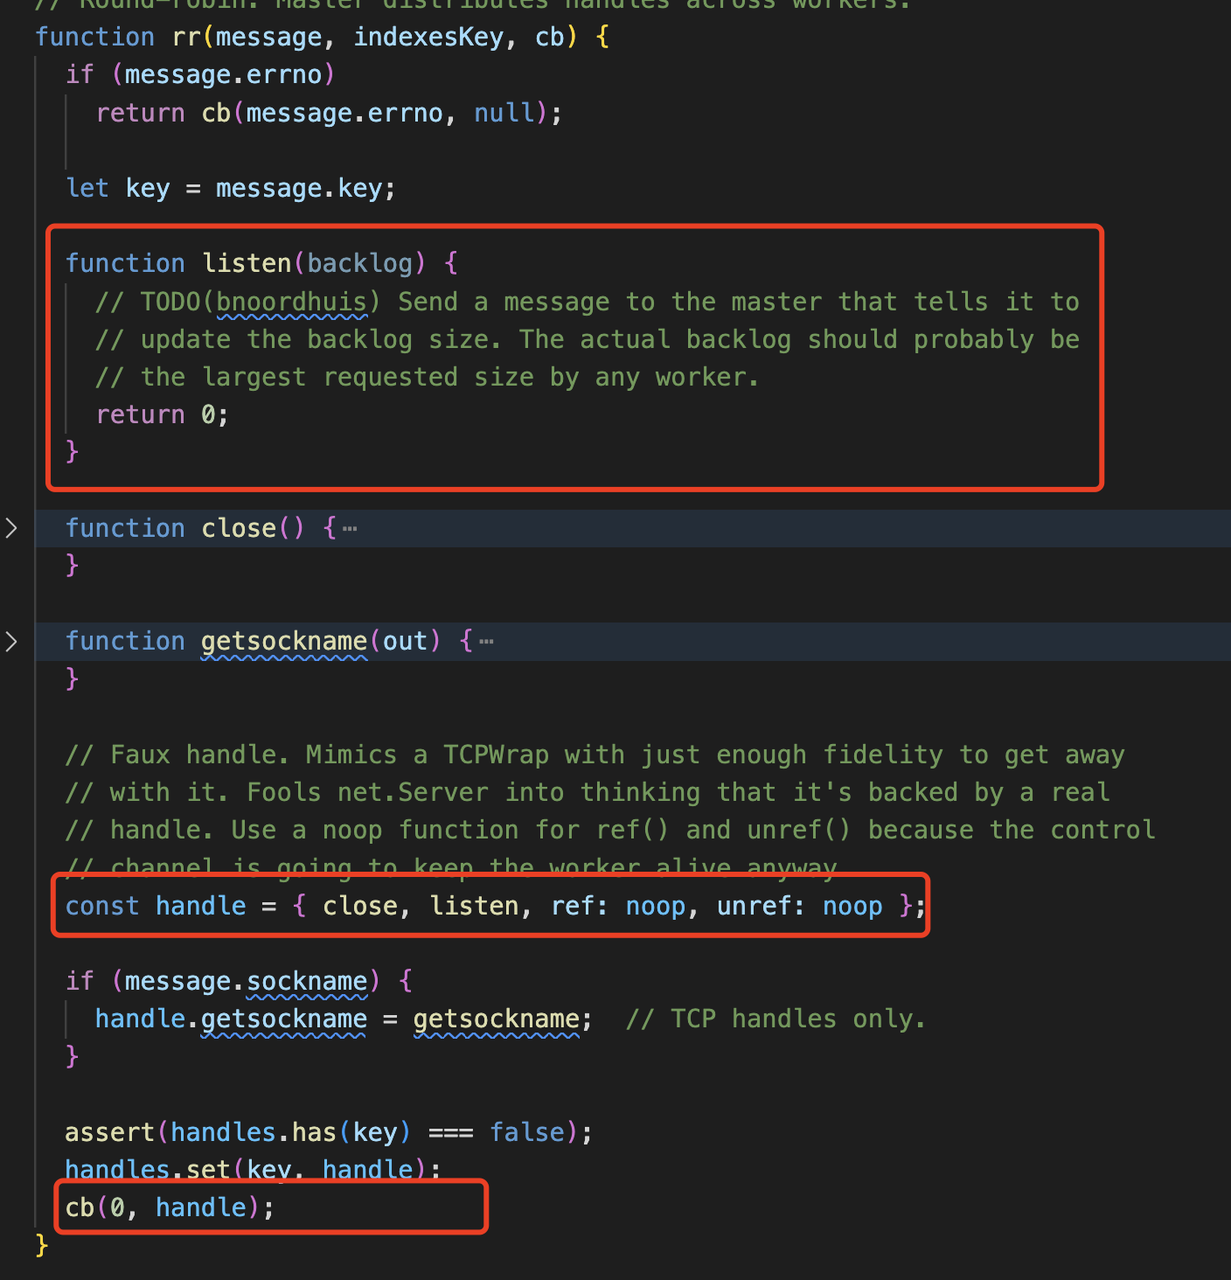
在 rr 函数中创建一个 fake handler 返回
这个 handler 就是上面 rr 函数中获取的 handler,而_listen2内部调用的实际是 fake handler 中的 listen 空函数,实际上工作进程并没有对端口进行监听distribute实现
1 2 3 4 5 6 7 8 9 10 11 12 13 14 15 16 17 18 19 20 21 22 23 24 25 26 RoundRobinHandle .prototype distribute = function (err, handle ) { ArrayPrototypePush (this .handles , handle); const [workerEntry] = this .free ; if (ArrayIsArray (workerEntry)) { const { 0 : workerId, 1 : worker } = workerEntry; this .free .delete (workerId); this .handoff (worker); } }; RoundRobinHandle .prototype handoff = function (worker ) { const handle = ArrayPrototypeShift (this .handles ); const message = { act : "newconn" , key : this .key }; sendHelper (worker.process , message, handle, (reply ) => { if (reply.accepted ) handle.close (); else this .distribute (0 , handle); this .handoff (worker); }); };
工作进程处理newconn消息
1 2 3 4 5 6 7 8 9 10 11 12 13 14 15 16 17 18 19 20 21 22 23 24 process.on ("internalMessage" , internal (worker, onmessage)); send ({ act : "online" });function onmessage (message, handle ) { if (message.act === "newconn" ) onconnection (message, handle); else if (message.act === "disconnect" ) ReflectApply (_disconnect, worker, [true ]); } function onconnection (message, handle ) { const key = message.key ; const server = handles.get (key); const accepted = server !== undefined ; send ({ ack : message.seq , accepted }); if (accepted) server.onconnection (0 , handle); }
总结 当主进程的 RoundRobinHandle 接收到一个监听请求时,它会调用distribute函数将客户端的 handle(socket 对象) 传递给工作进程。具体的逻辑为:将这个 handle 保存到队列中,并从工作进程队列中获取一个空闲的工作进程。如果存在空闲的工作进程,则从队列中取出一个工作进程并向其发送act: "newconn" 消息,以将 handle 传递给工作进程。工作进程会使用此 handle 与客户端建立连接,并向主进程发送一条消息表示是否接受了请求。主进程通过 accepted 属性来判断工作进程是否已经接受了请求。如果是则关闭与客户端的连接,并让其与工作进程进行通信。最后,主进程会不断地轮询上述过程以处理更多的客户端请求
多线程 为了降低 js 对于 CPU 密集型任务计算的负担,node.js v10 之后引入了 worker_threads 。可以在 nodejs 进程内可以创建多个线程。主线程和 worker 线程之间可以通过parentPort实现通信,worker 线程之间可以使用 MessageChannel 进行通信。多个线程之间可以使用SharedArrayBuffer实现共享内存,无需序列化
1 2 3 4 5 6 7 8 9 10 11 12 13 14 15 16 17 18 19 20 21 22 23 24 25 26 27 28 29 30 31 const { Worker , isMainThread, parentPort, workerData, } = require ("worker_threads" ); if (isMainThread) { const sharedBuffer = new SharedArrayBuffer (1024 ); const worker = new Worker (__filename, { workerData : sharedBuffer }); worker.postMessage (sharedBuffer); worker.on ("message" , (data ) => { console .log ("sharedBuffer" , sharedBuffer); }); } else { const sharedBuffer = workerData; const sharedArray = new Int32Array (sharedBuffer); setInterval (() => { const oldValue = Atomics .load (sharedArray, 0 ); const newValue = oldValue + 1 ; Atomics .store (sharedArray, 0 , newValue); parentPort.postMessage (`Current value in shared memory: ${newValue} ` ); }, 1000 ); }
多线程下共享内存为避免者竞态条件。node.js 也提供了Atomics对象用于执行原子操作,可以保证多个线程对共享内存的读写操作原子性


